
DESIGN & FEATURE BY NIKKI WHITE

All products used in this bathroom are linked below.
Many of you might be asking why we decided to go with this particular style of bathroom. We wanted to create a somewhat updated version of a bathroom you would find in the average home in America during the 1960s. Colors were used often at that time, and we really loved the muted tones of pink in these tiles. Although pink can be a controversial color choice for a bathroom, we are hoping to make you fall in a love with pink!
We have done a mix of old and new in this bathroom. A lot of homeowners have to do this in order to stay on budget or just be less wasteful. You will see quite a few older fixtures used in this Barbie Bathroom.
Let’s take it back to the beginning with the interior design board and tile selections that helped form this bathroom.
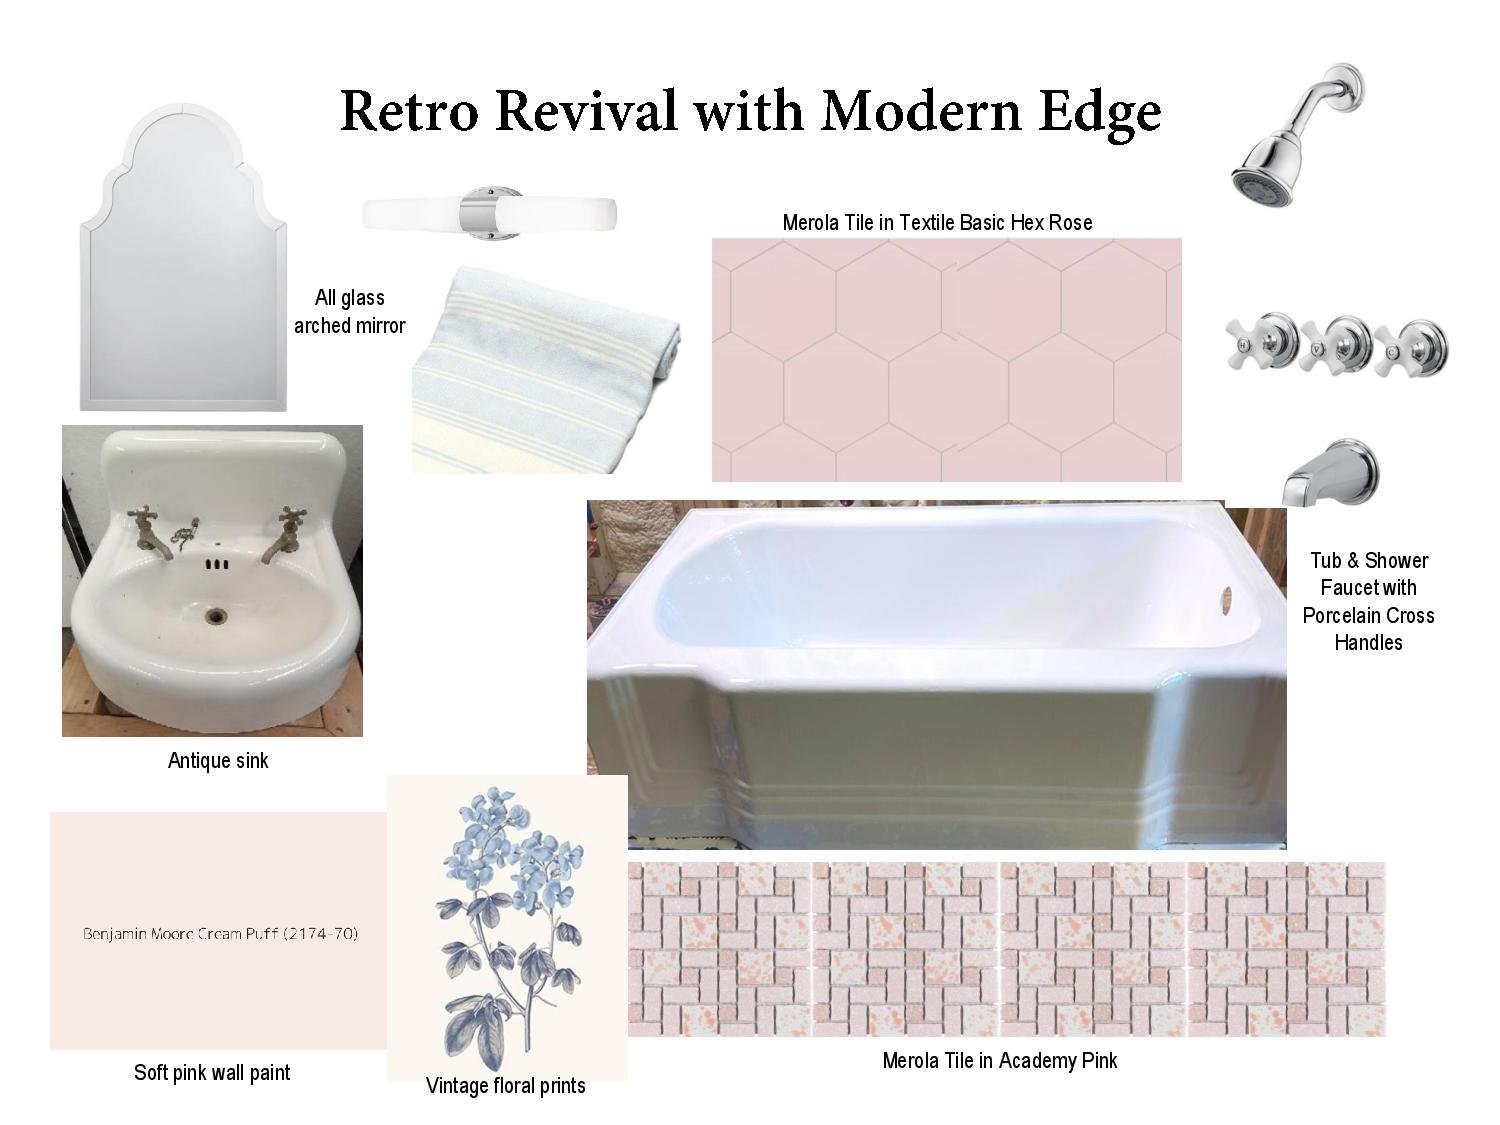

University Pink 11-3/4 in. x 11-3/4 in. Porcelain Mosaic Tile
Buy it at: Merola Tile

Textile Basic Hex Rose 8-5/8 in. x 9-7/8 in. Porcelain Floor and Wall Tile
Buy it at: Merola Tile
Starting from Scratch
Steve constructed this bathroom in his home office that sits above our garage. His course (the Home Office Bathroom Course) goes over how Steve built this extra living space above our detached garage. Steve built the entire structure on his own from the ground up. Since it was basically a new build, we had the freedom to do whatever we wanted. In order to give it a realistic and relatable approach, we decided to make the bathroom a standard size (5ft X 9ft). This bathroom size is very common in a lot of homes in the United States.
As described and outlined in his Home Office Bathroom Course, Steve first installed the electric/instant hot water tank/plumbing/drywall/vent fan/floor leveler/etc., creating the bathroom space. We had a vintage cast iron tub Steve refinished here and installed that first. After the tub was installed, it was time to waterproof. Steve used RedGard, and it was quite the experience.

The last time ever using RedGard!
Once the bathroom was prepped with the waterproofing, it was smooth sailing from there. Steve makes tile work look easy. It took him about 3 days total to tile the floor and walls (and that doesn’t include the grouting).


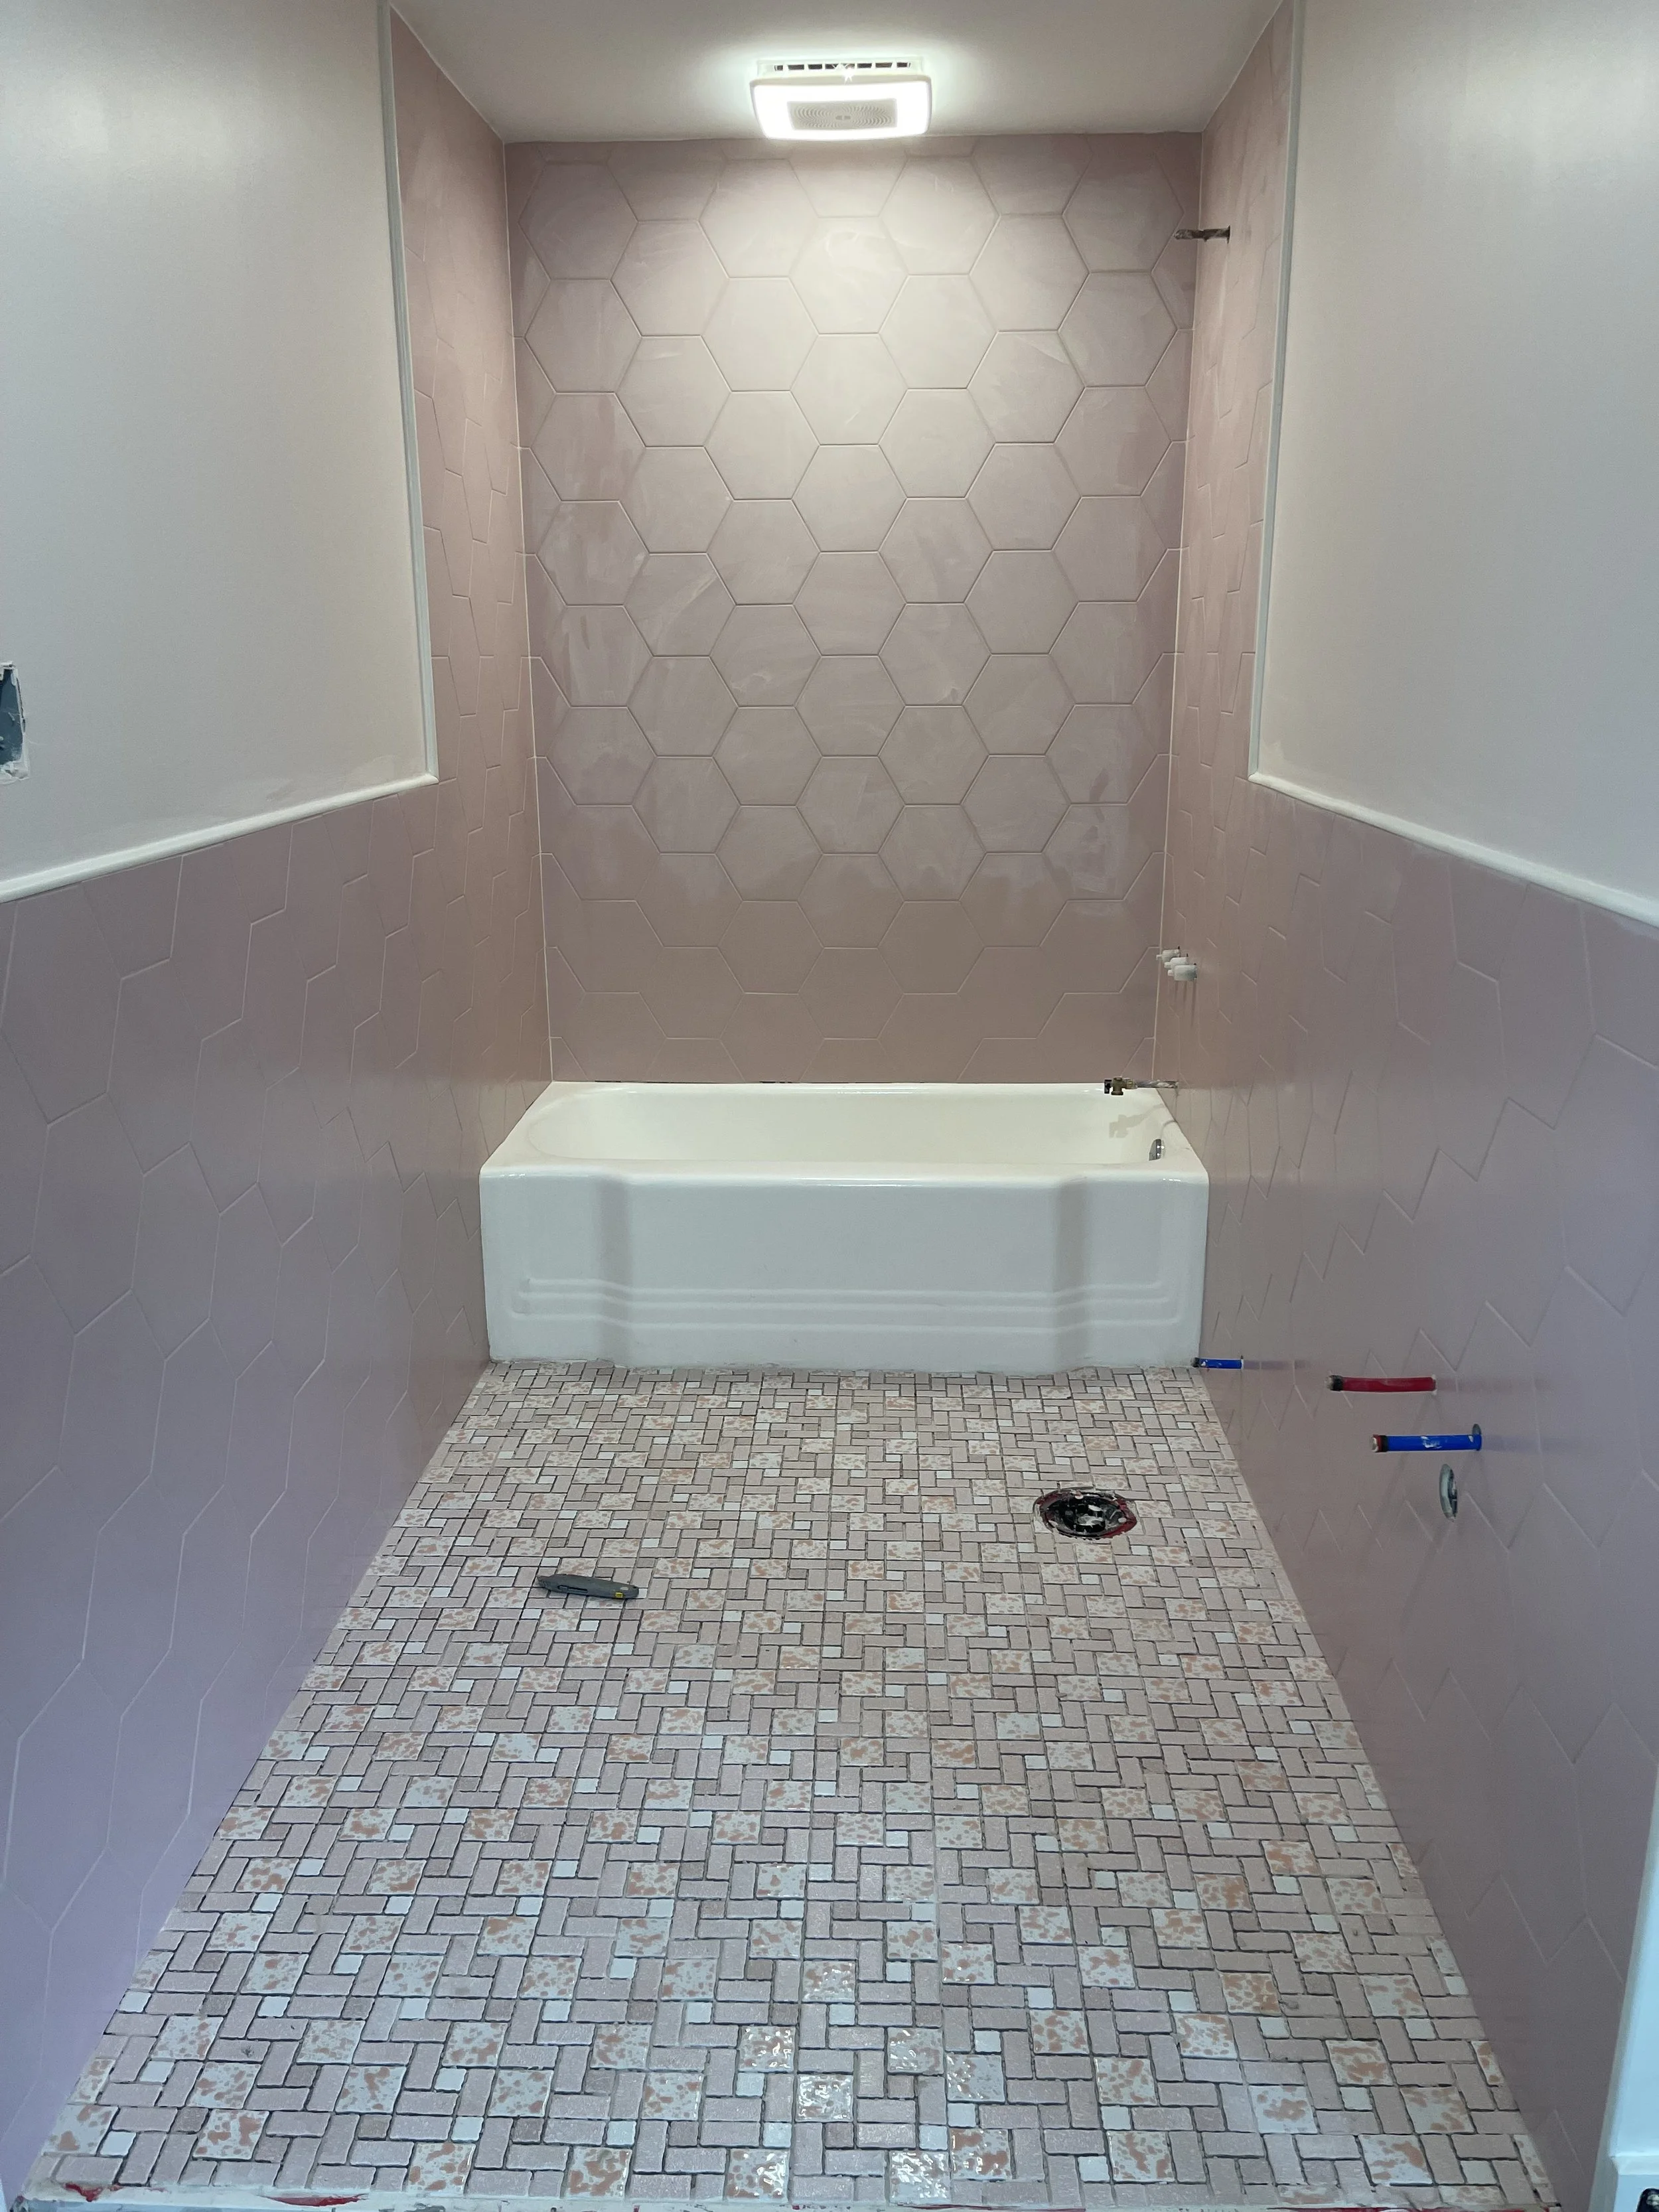
The tile is very high quality and a breeze to cut. The pink tones are well-muted, so the bathroom isn’t a blaring or garish pink. It’s very soft and subtle. The floor tile is textured, giving it some grip for your feet to hold on to when stepping out of the tub. For those of you who are sensory sensitive, you will find the floor and walls to be incredibly soothing.
The wall and floor grout we decided to use is Mapei FA in Honey Butter. Honey Butter is off-white, and it blended seamlessly with the tiles.
The next big item to find and install was the bathroom sink. We knew we wanted something vintage, floating, and fairly beat up. We are fortunate to have an upcycling warehouse called Construction Junction in Pittsburgh. They sell so many vintage and modern items found in homes and buildings around the Pittsburgh area. We found our sink there for only $15!

Looks can be deceving… Construction Junction is a gold mine!

Our $15 vintage sink. Steve used the Ekopel 2K Recasting Kit to paint the sink white.
Installing an old sink like this one is usually a challenge. The bolts and screws and brackets don’t come with it, so you have to use some creative solutions to properly mount this sink on a wall. Steve managed to do it, though it took him a little longer than he would have liked.
Once the sink was in, the toilet followed. We got an American Standard Cadet toilet, which is one of Steve’s favorites to install. It comes pre-packaged with everything you need to install it.


The floating quartz shelves were Steve’s idea. The extra bath storage was needed, and it’s a great way to elevate your bathroom AND add storage capacity! We went to a local granite manufacturer in our area called Asian Granite. This is actually much easier to do than you might think. Steve made a dedicated video on measuring, templating, and installing these floating shelves that you can check out here.
STYLING THE BARBIE BATHROOM
When it came to adding those finishing pieces to the Barbie Bathroom, we wanted to keep it somewhat modern with a mix of vintage.
In terms of the foundation of this bathroom, the floor tile and its color are definitely an interior style throw-back. The wall tiles help bring this bathroom to the present time. The hexagon shape and matte finish are 2 key style features that are trending today. Mixing these two together is a great way to unite the classic with the contemporary.

Products featured
Hexagon Tile Rose- Merola Tile
Beveled Oval Mirror- Vintage from Facebook Marketplace
Sink- Vintage from Construction Junction
Central Brass Sink Faucet- Build.com
Pink Glass- Ikea
Q-Tip Holder- At Home

Baby Blue Turkish Bath Towel- Amazon
Hexagon Tile Rose- Merola Tile
Pink Mosaic Floor Tile- Merola Tile
Vanity Light- Amazon
Fur Rug- Ikea
Shower Curtain- At Home
Shower Curtain Bar- Amazon
Toilet Paper Holder- Amazon

Baby Blue Turkish Hand Towel- Amazon
Hand Towel Hook- Amazon
Wall color- Intimate White by Sherwin Williams
Hexagon Tile Rose- Merola Tile
Retro Barbie Print- Amazon
White Frame- Ikea


FINAL THOUGHTS
Adding the baby blue with the towels and vintage floral prints was a great way to break up the abundance of pink. The neutral, white accessories (i.e. the small rug and shower curtain) lend some texture to the space. The mosaic flooring, bath tub, and vanity sink really lend to the vintage vibe of this bathroom.
By taking a leap and using pink tile in a bathroom, we definitely feel much more emboldened to continue to use colorful tile. It really does evoke a positive feeling, and it’s a great mood shifter! This is a very taste-specific design, but a fun one that mainly made most people smile when we showed it to them.
Our advice from this project: You only live once. Go bold with your bathroom tile and have fun with it.